Post Production Diary

Day One

To start my documentary, I decided that I wanted a picture of each participant/talent, which then would be replaced by an image of a well known Northern landmark- such as the Angel of the North. I then decided that I did not want the image to just be still, so I chose to experiment . I wanted to have a sort of slow zoom effect for the image, with a blurred image behind it so it was not just a black screen. I looked up some tutorials on how to get this effect and eventually managed to achieve the desired result, which I believe gives my documentary a sort of unique twist. I then added the documentary title to the 'wings' of the Angel.


After creating the opening of my documentary, I began to add footage. I sifted through all of the footage from the performance class (as this was the first thing I filmed) and began choosing the best pieces of footage. I decided to use one of the main parts of the performance for the first part: however, after going over it a few times I decided it would be best to start off with one of the interviews rather than going straight into the performance with an unknown voice narrating it- as this could be quite confusing for my audience.

After swapping out the performance footage for the interview footage, I began experimenting with how best to introduce the person speaking. After experimenting with a few different ways I decided upon the little black and white 'label' in the image above, as I felt this made my documentary unique and different to others, and also gave it a little 'personality'

After adding the box, I added the name and profession of the person speaking so that they were properly introduced, later on I added a dissolve transition so that the box did not just disappear and so that the disappearing of the box and name was smooth.
Day Two

Today I had more footage to add as I had been filming the weekend before. This footage was for the magician portion of my documentary- so I added in an image of the magician into my intro. After adding the image of the magician in, I added music from Bensound for the intro, before I resumed editing the performance section, where I added snippets of the classes performance over the interview with one of the performers, having already introduced her beforehand so my audience would not be confused as to who is talking. I tried to include the snippets of the performance in line with what the interviewee was mentioning, so that the footage fit with her words rather than having something completely unrelated shown.
 I then moved back to the footage of the interview, deciding to add transitions further down the line to ensure all the footage I needed was there before I added transitions between footage. Whilst adding and taking out footage, I also began editing how the footage looks, using the brightness and contrast tool on Premiere Pro, just to ensure the image was not too bright or too dark.
 Choosing the best footage for my documentary was a challenge, as I did have a lot of good images and video to use, so to comb through each video I added the best looking ones to the timeline and began to compare them on overall looks and relativity to what the interviewee was mentioning. Using this comparing method I was able to choose the best footage for my documentary.
 Here is where I started editing the footage shown using the brightness and contrast tool. This took a lot of experimenting with different brightness levels to see which level made the footage look best. Sometimes just decreasing or increasing the brightness would be enough, but other times I had to increase or decrease the contrast to balance it all out.
 I then began to add in the other piece of interview footage (as I had two different takes where the interviewee talked about two different things- and there was no need to reintroduce her) and added more performance footage over the top to showcase it.
 After showcasing more of the performance footage, I decided to have some longer sections of the interviewee talking, but to also include some images popping up relevant to the subject as she spoke. In this shot she was talking about how her class has performed in different places, such as the Empire Theatre (Shown in the right corner)
 This was the timeline of my project on day two when I had finished editing for the day. The intro and the footage was five minutes all together, so I have no worries that my documentary will not be long enough for the brief.


Day Three

Today I began editing the footage of the magician. I did not take many screenshots of my work today because I was focused on finishing the magicians section today rather than having to split the editing over two or three days. I added in the footage that I would be using, edited the look of the footage with the brightness and contrast tool and then began cutting the footage to the right length and adding them all together.

Once I had edited all of the footage together, all that was left to do for this section was to add the box to introduce the interviewee, but before I could do that I noticed the audio did not sound the best.

I googled some tutorials so that I could edit the audio to make it sound clearer and overall better, and then got to work editing the audio. I used the built in audio track mixer in Premiere Pro and, using the tutorial I had found, I managed to properly edit all of the audio in my documentary to make it clearer. Doing this also gave me the opportunity to experiment with audio editing, which I am not the best at, so being able to use a built in editor for audio made it a lot easier for me. The editor also gave me the opportunity to 'fade' things out, such as background noise and excess 's' sounds.
After editing the audio (and adding the introduction) I was done editing the magicians section, and decided to get a head start on the singers part of my documentary. As mentioned in my production diary, we did hit a snag with this part as the singer had forgotten to bring their backing tracks and could not sing without them, and I would not have been able to include footage of them singing copyright claimed songs, so instead we filmed the interview. Unfortunately this did make the singers part much shorter than the other two, but I included it regardless, as even just their interview showcased their talent and explains how they got into it. I did not take any screenshots of this part, as it was just one piece of footage lasting for a minute and did not need editing (other than the first and last 2 or 3 seconds cut out and the brightness changing ever so slightly)
Day Four

Today I began editing the game artists footage, as I had finished filming this now. I began by adding in the interview footage, including the introductions I had included in the other interview footage.
I then let that footage run for a little while, before adding in footage of the work the artist had done as to not have this entire section be footage of the interview, as this would be quite boring and may cause the viewers to lose interest.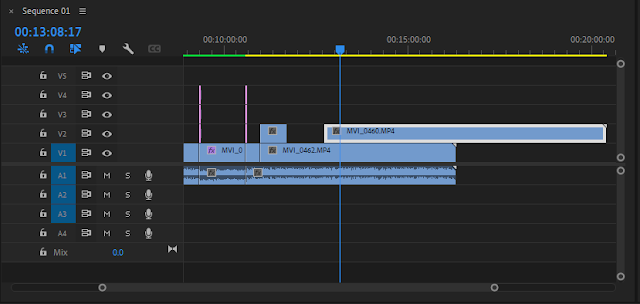 I then cut the footage to the desired length before moving it out of the way, so that it would go back to the interview footage. I would usually delete the leftover footage from the cut, but I decided it would be easier for me to just move it away from the rest of the footage, as then later on I could just add different sections of it back in without having the re-open the footage again. I also had to unlink the audio from the work footage, as there was background noise, which was fine as I planned to remove the audio anyway to just have the interview voiceover playing underneath.
 This is what my timeline looked like during the artists footage, I was quite happy that overall it came to 16 minutes (after having finished editing and adding in the ending) as this was a good length for the brief we were given and I was worried that without the guitarist that I would not have enough footage.
 After I had finished editing the footage I tried to color grade the project. This was my first time color grading in Premiere Pro, or anywhere so I was worried that it was not going to look good. I tried some of the presets that were already on Premiere Pro but that made the images look somewhat burnt and oversaturated. I then tried to color grade it manually, adjusting the settings myself. I then ran into the problem of having to manually edit the color grade on every single piece of footage separately, but with some research online and some help I managed to export the custom color grade and was able to just add it to the rest of the footage without having to adjust anymore settings.


I did not make the documentary ending today, as I had made it another day and forgot to screenshot and document the process, but I used the essential graphics panel that was built into Premiere.


I also reused the title screen in the beginning for the ending, this time using a slow fade so that it wasn't
as abrupt from a black screen to a lighter image.

With this I was done editing the first draft of my documentary. I will create a google form and send it out to receive feedback, which I will then act upon to make the next draft of my documentary. I will continue to work on feedback until either there is not many negatives or until there is none at all to ensure my documentary is the highest quality it can be.
Feedback
After finishing editing the first draft, I created a Google form to receive feedback. Once I sent it all out I waited for feedback so that I could act upon it. Eventually I received seven responses on the form, which I thought was enough to act upon the feedback.


The first piece of feedback I decided to act upon was the audio sync issue, as a few people brought it to my attention that the audio was a little out of sync in one part. To fix this I found the same piece of footage on my SD card and put that onto the timeline. I then watched it through trying to find the part I needed. Trying to get the footage synced up was quite difficult, as it has not been an issue I have encountered before. I tried matching up the second of the same footage, only to find out that the audio did not match, so instead I tried to match up the audio alone, which did not go to plan either.
 That did not work either, but eventually I managed to sync up the second piece of footage with the audio from the first piece of the same video so that it was all synced up.


I then began to work on the opening, as I was told the images made it a bit static. I did try looking for a way to make it less static, but I felt as though if I included videos in place of the images it would have made it look slightly weird, so I chose to keep the images. I also experimented with having the title text fade in rather than abruptly appear on the wings. I decided to use a gradient wipe transition for this.

Then I started experimenting with different transitions, as many people said the sharp cuts to the footage were a bit abrupt. At first I experimented with a dip to black between footage, but it did not give the desired transition, so instead I chose a film dissolve transition, which I then experimented with on other changes of footage. I then decided to use cross dissolves for cuts between interview footage and talent footage, just to mix it up a little bit.
 With this my transition work was done, and I just need to work on the other pieces of feedback.


I was also told to add music underneath some parts of the documentary, but I felt as though it would not be heard, as it would need to be quiet enough so people could focus on the interviews, so I decided to not include music.
I altered the credits slightly to make the credits roll a little slower and then I was done editing on the feedback.
I then gave a small screening to a small group of people to receive verbal feedback so that I was not just have feedback through Google forms. Unfortunately I did not have the equipment on hand to record the feedback I was given, but I was told that the changes that I had made were good and ran alongside the feedback I was originally given. I was then told that the documentary did not need to have anything else changed, so this second draft of my project was the final, and I had finished the creation of it.

Comments
Post a Comment